We have web pages, they work in the browser. Using JavaScript and CSS, these web pages can look and work just as well as applications on a computer — with an interface, interactivity, data storage, and so on. And there are the applications themselves: they work on computers without a browser.
“Why not combine them? – thought the developers. “Let applications from the web live on computers as desktop applications!” So Electron appeared.

Electron is a framework that allows you to create web-based applications for desktop operating systems. It is based on the Chromium Node.js page display library, which extends the capabilities of JavaScript. As a result, from an HTML page with the help of Electron we get a ready-made application that will work by itself.
Based on Electron, for example, VSCode is built – one of the favorite tools of many programmers. If you do not know what it is – read our review of development tools. Even on Electron, we collected a new version of Skype and the desktop client of WordPress.
In this article, we will compile a program from our password generator.
Warning This article is intended for those who have absolutely no experience in the development and assembly of programs. All the examples and code that is provided in the article are aimed at creating their first application as quickly as possible and are probably not written optimally from the point of view of developers. But we will sacrifice correctness for the sake of simplicity, and we are not ashamed.
We will also show all examples on Windows. For the poppy, read the documentation – everything will be almost the same, but with some nuances.
Install Node.js
Go to nodejs.org/en/download/ and select your operating system. Downloading and installing the distribution will take about 5 minutes. As a result, several new programs will appear on your computer, including the Node.js command line – Node.js command prompt. In it, we will continue to assemble our generator.

Choosing a platform for installation
Node.js also includes npm, a package manager that will help us build. A package is a small utility program that can be accessed from your main program for help in some matters. If we need a package that is not already on the computer, you can install it with the npm install <package name> command. We will use it several times in our project.
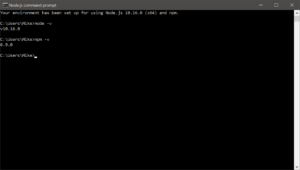
To make sure everything is installed correctly, open the Node.js command prompt and execute the following commands:
node -v (This command should print the current version of Node.js)
npm -v (This command should print the current version of npm package manager)
Just enter these commands into the program and press the enter key:

Verification was successful – all versions on the screen
Install Electron
To do this, run the following command:
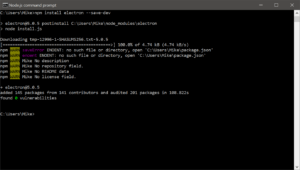
npm install electron --save-dev
It will install Electron and download all the necessary files to the computer, so as not to download them every time from the network.

After installing Electron on the computer, 145 packages were added, some of them will be used in the project
Prepare the project folder
The simplest Electron application will have this folder structure:
app_name/
├── package.json
├── main.js
└── index.html
This means that we should have a folder with the name of the program where the three files are located. Package.json is responsible for how Electron will assemble our project, main.js – a script that opens the application window, defines some parameters and some event handlers, and index.html – this will be our file with the generator, only under a different name.
Create a gen folder in the root of drive C and fill it with empty three files for now. How to fill these files – read below.
Fill package.json
Copy this code, paste it into any text editor and save the file as package.json. You can’t dig into the contents for now.
language: JSON
{
"name": "electron-app",
"version": "1.0.0",
"description": "",
"main": "main.js",
"devDependencies": {
"browser-window": "^0.4.0",
"electron": "^5.0.5",
"electron-packager": "^14.0.0",
"electron-prebuilt": "^0.35.2",
"electron-prebuilt-compile": "^4.0.0",
"os": "^0.1.1",
"package": "^1.0.1"
} ,
"scripts": {
"start": "electron main.js"
} ,
"author": "",
"license": "ISC"
}
We fill main.js
We do the same – copy the code, paste and save as the main.js file in the gen folder.
language: JavaScript
const electron = require('electron');
const app = electron.app;
const BrowserWindow = electron.BrowserWindow;
let mainWindow;
app.on('window-all-closed', function() {
if (process.platform != 'darwin') {
app.quit();
}
});
app.on('ready', function() {
mainWindow = new BrowserWindow({width: 1000, height: 625});
mainWindow.loadURL('file://' + __dirname + '/index.html');
mainWindow.on('closed', function() {
mainWindow = null;
});
});
Copy the generator to the project folder
The beauty of Electron is that if you have a project – one HTML page, then all you need to do is copy it to the project folder and rename it to index.html. So let’s do it.
As a result, we have in our folder all three files that are needed for assembly. You can proceed to the main part.
Install modules
We will need two modules: one is responsible for the browser window in which our program will work, and the second is for the collector, which will collect all the files into one executable offline file.
Both modules are installed the same way – on the Node.js command line, we will do the following in turn:
npm install browser-window --save-dev
npm install electron-packager -g
Putting the application together
Without leaving the Node.js command line, we go to the project folder. To go to a folder level up, use the command
cd ..
And to go to the desired folder, you need this command:
cd folder_name
If everything is done correctly, then the command line will start like this: with: \ gen>
Now update all the dependencies in the project. This means that Electron will go into the project folder, look at all the files and make sure that we have enough. If not enough – tell you exactly what and where to get it.
npm install
It remains to collect everything into one file with the command:
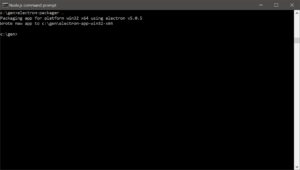
electron-packager
Here is what she will do:
- will understand that the project is in the current folder;
- take the name of the program and version number from the package.json file;
- will understand which operating system and architecture the command line is running on, and make a program for the same system;
- collects all the files into one that we need;
- put the finished result in the folder electron-app-win32-x64 (for Windows, the name on the poppy will be different).
We go into this folder, find the electron-app.exe file, run it – everything works!
What’s next
If you liked creating your programs this way, read the project documentation: electronjs.org/docs.
Electron is not the only framework that can do this, there are still NW.js. It is slightly different from Electron, but the principle of their work is similar.